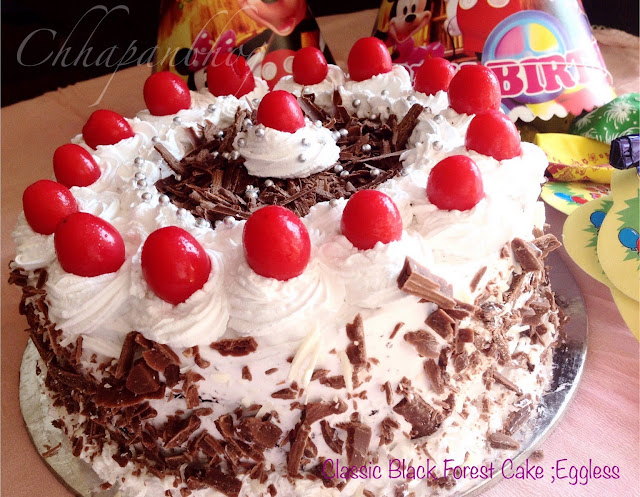
Eggless Classic Black Forest Cake
It was my Munchkin’s 2nd Birthday on 22nd
of April, and we had planned a small celebration with very close family and
friends. Since he is getting big fan of Thomas “The Train” we ordered a Thomas
themed cake for him. But But But….. How could a Baker mommy not bake a cake for
her Sonshine…. :D
Did this Simple, All time Fav. No fail recipe of a Classic
Black Forest Cake. I had planned to go simple as already had too much to do for
the celebration. So kept simple, and to my surprise even in this burning hot
sunny days whipped cream behaved really well, and for the first time got Stiff
peak as per my expectation. While Baking and Icing perfect cake, this was one
eureka moment for me. And, what better that this was for my little hero..
Went simple with less coco in sponge as I didn’t wanted the
sponge to taste bitter, went simple and less sugar on icing as wanted my champ
to enjoy the cake without mommie dear worrying about the sugar content.
So this time I used aerated Soda for the sponge and was very
happy with the results. Very soft, moist and perfect for any chocolate based
cake. And because of Soda, I was pretty sure that the crumb would be nice and
the cake will rise nicely.
I am planning to keep the sponge for my further cake with
coco based as it is with this recipe.. J
So, let’s begin with ingredients followed by the process of Sponge,
whipping the cream and at the end assembling of the cake..
Ingredients for the Sponge
-
1 and ½ cups of Plain Flour/Maida
-
½ tin of condensed milk/ approx. ½ cup
-
1 Tbsp of Vanilla Essence
-
½ tsp baking soda
-
½ tsp baking powder
-
½ cup melted butter
-
¼ cup or more of Aerated soda ( you can use any
cola, will not really make any difference to the taste)
-
2 Tbsp of Coco Powder
Process of Sponge
1.
Pre heat the oven at 180 Degrees C
2.
Grease and dust an 8” baking pan
3.
In a bowl take melted butter and add condensed
milk to the same and mix till both are formed into a homogeneous mixture
4.
To this add vanilla and mix
5.
In a separated bowl take together flour, baking
Soda, Baking Powder and coco. Mix them all well.
6.
Now mix the flour mix to butter mixture
alternatively with cola ( Add ½ Flour mix and half Soda/Cola)
7.
Repeat till entire flour is mixed with butter
mix and a nice smooth batter is formed.
8.
Pour the cake batter in the greased and tap the
cake tin on kitchen platform couple of time.
9.
Bake at 180 degrees C for 30 mints. Or till a
tooth pick comes out clean.
Ingredients for whipping the cream
-
1 cup heavy whipping Cream/I have used non dairy
Whipping cream
-
½ cup icing Sugar
-
Few Drops of Vanilla Essence
Process
1.
In a stand mixer bowl/ food Processor Bowl add
the cream and on low speed beat till soft peaks are formed.
2.
Once done, slowly add the icing sugar and whip
on medium speed.
3.
Once the peaks starts getting sift add vanilla
and gradually increase the speed to high.
4.
Switch off the blender once sift peaks are
formed.
5.
Put the cream in refrigerator for ½ hour before
use
Ingredients for assembling the cake
-
Sponge
-
Whipping Cream
-
Chocolate Shaving
-
Canned and Seedless Cherries
Assembling of Cake
Process
1. Take the cake on a plate and slice into 3 using knife.
2. Now, take one of the slices on rotating table and apply sugar
syrup
3. Take Dollop of Whipping Cream by a spoon, and spread evenly
with the help of spatula, here if you wish you can also add chopped cherries.
4. Place 2nd slice and repeat the process, Spreading Whipping
Cream and few Chocolate Shavings this time.
5. Place 3rd slice and now do a crumb coat / rough coat to the
cake using generous amount of whipping cream. Here you need to roughly cover
the entire cake with frosting using the spatula.
6. After the crumb coat freeze the cake for at least 20 minutes.
7. Now take generous amount of whipping cream and smooth en the
cake from all the sides and top.
8. Now, decorate as you desire.
Your Awesome Looking and Tasting Black Forest Cake is
Ready..
For more interesting, vegetarian recipes and eggless baking recipes, please followN us on - https://www.facebook.com/Chapanbhog